
Bed heater
The bed heater is the resistive heating element embedded in the aluminum bed plate. It heats the print surface to improve adhesion and prevent warping during printing.
Assembly wiring (step 5.1 — Heated Bed Setup)
Section titled “Assembly wiring (step 5.1 — Heated Bed Setup)”From the assembly manual (step 5.1), 1 operator, 5 min:
- Connect the bed cable to the “BED” power box connector (step 5.1.1)
- Connect cable [3] — the temperature sensor cable — to the bed (step 5.1.2)
The socket is labeled “BED” on the power box (under the panel box, right side of the machine). Always connect to the correct labeled socket.
Electrical connection
Section titled “Electrical connection”See Power outlets (power box) and Bed heater on wrong outlet for full details.
| Parameter | Value |
|---|---|
| Power socket | bed socket on the power box (firmware-controlled, 220V) |
| Voltage | 220–240V AC |
| Heating mat | 1.2 m square — deliberately larger than the ~1000 x 1000 mm print area |
| Power draw | ~2000 W |
| Control | Klipper watermark (max_delta: 1.0 — on below target−1 °C, off above target+1 °C) switching an SSR |
| Safety cutoff | 110°C — Klipper blocks/errors if the bed exceeds this |
Temperature ranges by material
Section titled “Temperature ranges by material”The bed temperature for a material is whatever its Ginger Slicer profile sets — the slicer is what sends it, so that is the only place it is true. The shipped values are listed in Material profiles.
As a shape rather than a number: PLA profiles sit in the 50–70°C band and PETG at 80°C. Two things are worth knowing beyond the number:
- Too hot a bed makes PLA whiten and degrade — see the note below
- PETG on bare glass can bond hard enough to chip it. Use a release layer, see Bed adhesion sprays
Warmup time and power consumption
Section titled “Warmup time and power consumption”| Parameter | Value |
|---|---|
| Time to reach 80°C | ~30 minutes |
| Peak bed power | ~2000 W |
| Peak total (bed + printer) | ~3 kW (~2 kW bed + ~1 kW printer) |
Plan ventilation and circuit sizing accordingly. A dedicated 16A circuit is recommended for the printer + bed combination.
How the bed is controlled
Section titled “How the bed is controlled”The bed does not use PID. It runs on watermark control — the simplest scheme Klipper offers. max_delta is 1.0, so the heater switches on once the bed falls a degree below target and off once it rises a degree above: a ±1 °C swing, two degrees wide. Nothing is tuned, and nothing can be.
That is worth knowing for two reasons. The bed temperature will always wander gently around the setpoint rather than sitting on it, which is normal and not a fault. And there is no bed PID calibration to run — if you find a procedure telling you to, it does not apply to this machine. See Heater band.
How it works
Section titled “How it works”The bed heater is switched by a solid state relay (SSR) inside the electronics box, and the SSR is driven by Klipper’s watermark controller: full on a degree below target, full off a degree above it. It is not proportional and it is not PID — which is why the bed is never PID-tuned. The NTC thermistor in the bed plate closes the loop.
The same relay is what makes a shutdown safe: when Klipper stops, the bed socket goes dead with it. That only holds while the heater is on its own socket — see Power outlets (power box).
The bed has two temperature sensors
Section titled “The bed has two temperature sensors”The bed plate carries two temperature sensors, and only one of them is connected. The second is a built-in spare: if the one in use fails, the harness moves to the other and the machine keeps working, instead of the plate coming apart to fit a new sensor.
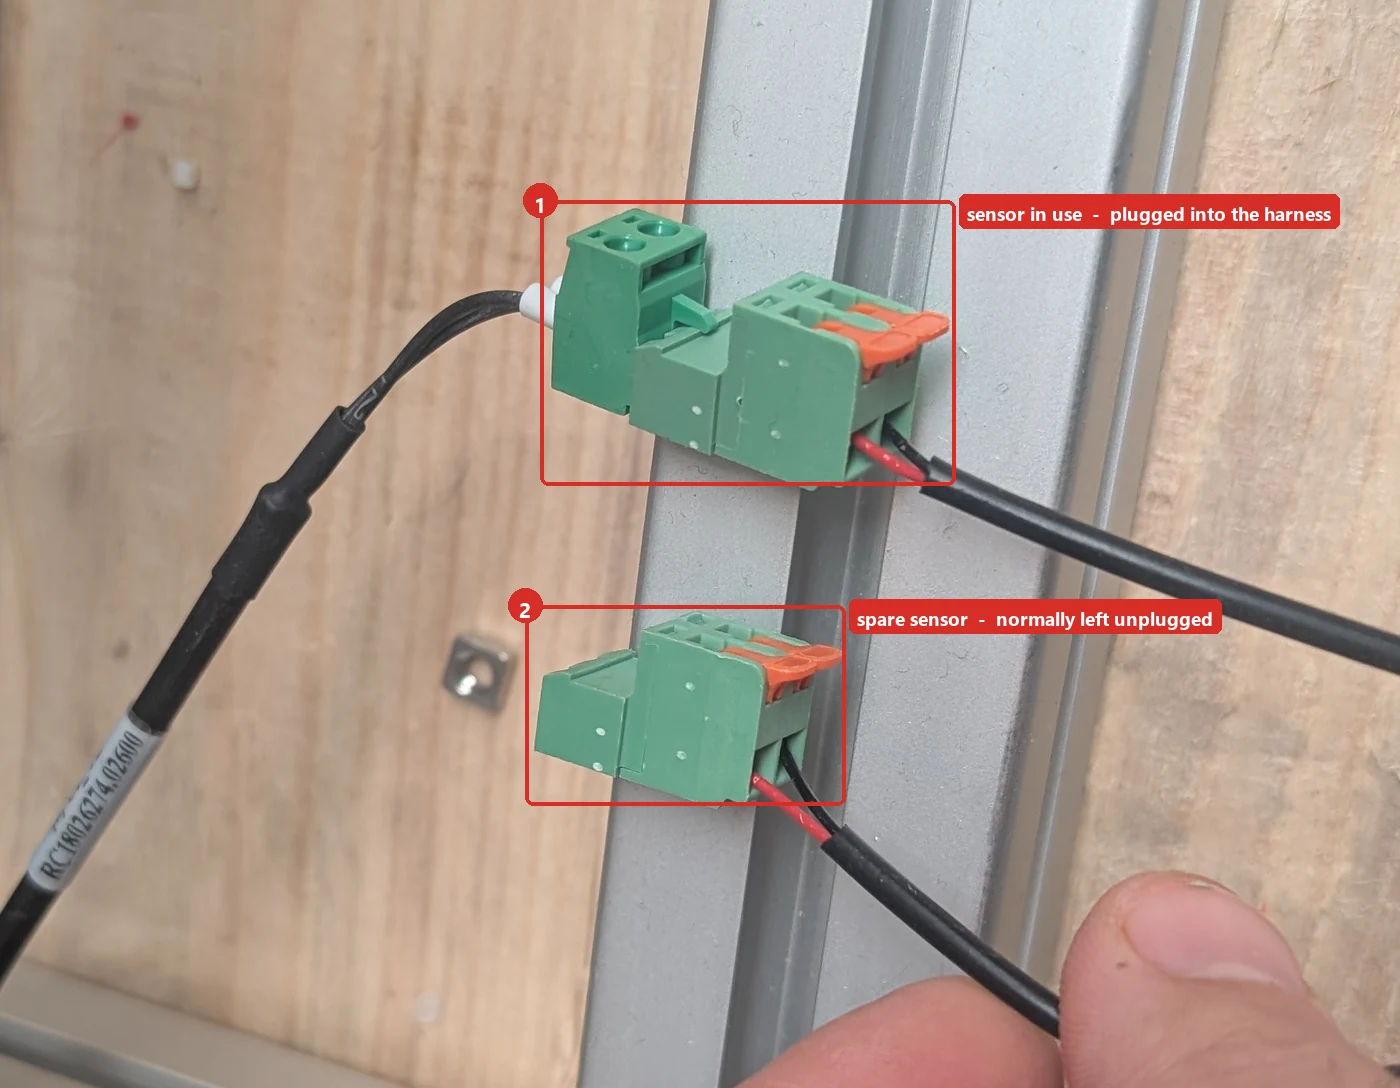
So an unplugged connector under the bed is normal — it is not a cable someone forgot. Both sensors end in the same pluggable terminal on the frame rail beside the bed; the harness from the machine goes into one of them and the other sits open.
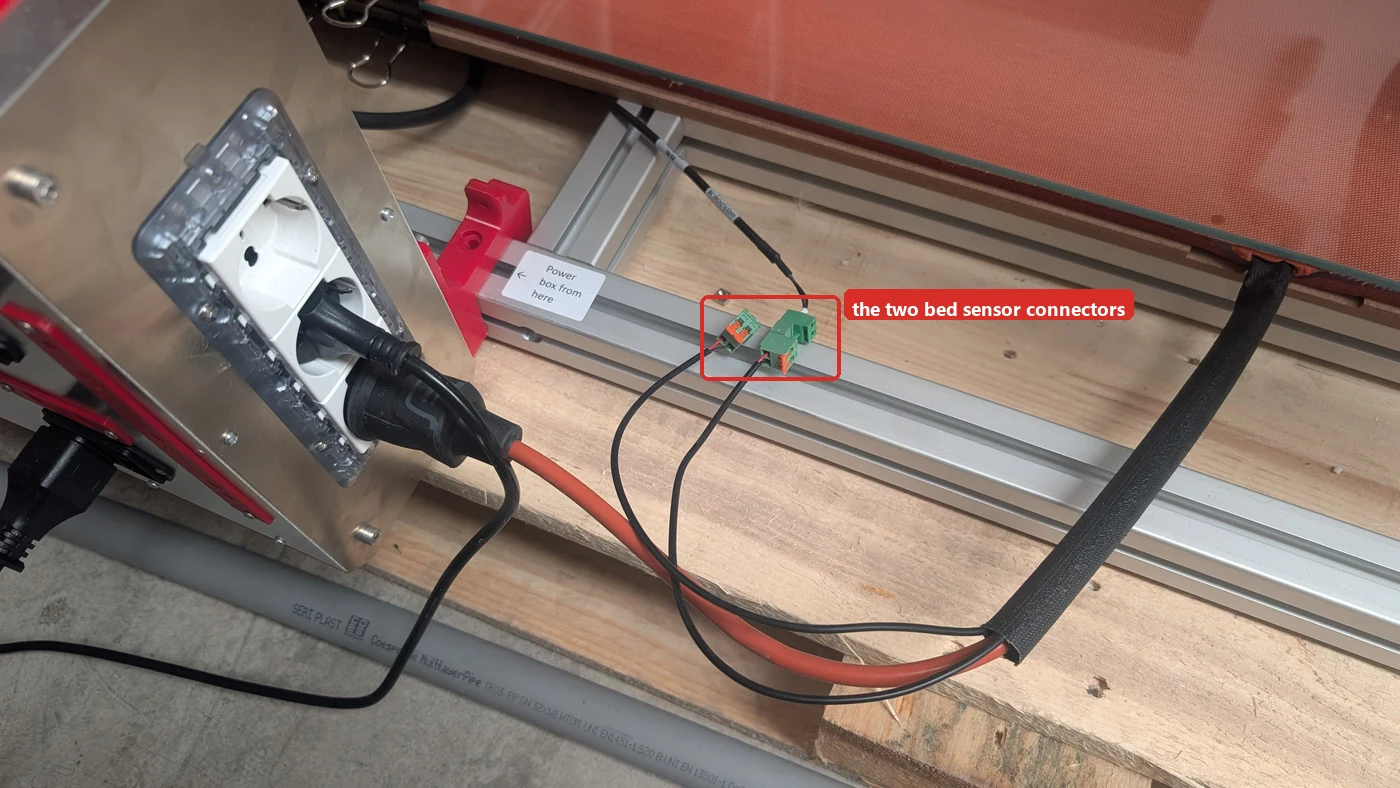
The bed reads -99 °C, or the temperature flickers
Section titled “The bed reads -99 °C, or the temperature flickers”Suspect that connector before you suspect the sensor.
A steady impossible reading means the circuit is open; a reading that jumps around means it is touching only intermittently. Both point at the plug, not at the thermistor — the same reasoning as for the barrel zones in Temperature sensor disconnected.
- Unplug the connector and push it back until it seats fully
- Firmware Restart, then check the bed reads close to room temperature before heating
- If it will not hold, move the harness onto the spare sensor’s connector — that is what the second sensor is there for
Failure modes
Section titled “Failure modes”Bed not reaching temperature
Section titled “Bed not reaching temperature”- Check that the power cable is in the bed socket and the socket is live
- Most common cause: a loose SSR cable. When the bed does not heat, it is almost always because current is not reaching the bed — usually a loose connection on the SSR BED wiring, not a failed SSR or heater element. Double-check every connection on the SSR BED cable first. The specific place to look is connector [2] on the power box board: two of its four screws are the SSR BED signal, and one that has not bitten leaves the bed socket dead with no error anywhere — see the two power box connectors.
- The heater element itself effectively never fails — do not assume a dead element. If no current arrives, look at the wiring/SSR connections
- If the bed graph shows no rise at all: confirm the SSR is switching (LED indicator should blink during heating); if it switches but no heat arrives, the fault is downstream in the cabling
Bed error at startup (110°C cutoff)
Section titled “Bed error at startup (110°C cutoff)”- Bed cable is plugged into the forced socket (always-on at full voltage) instead of the correct bed socket
- Or a large solid first layer printed over the centre sensor caused a false reading (see the centre-sensor note above)
- See Bed heater on wrong outlet
Print won’t start after heating or bed leveling
Section titled “Print won’t start after heating or bed leveling”The print now only waits if the extruder is more than 5°C below the slicer target — it heats up and then starts. If a print does not start, check the extruder has reached within 5°C of target.
Bed overheating / print sticks permanently
Section titled “Bed overheating / print sticks permanently”- For PETG: increase adhesion spray (Dimafix, Rain-X) and ensure the spray forms a release layer — without spray, PETG bonds so strongly it can crack the glass when the part is removed
- See Bed surface and Bed adhesion sprays
Bed leveling temperature note
Section titled “Bed leveling temperature note”Always run bed leveling with the extruder at printing temperature, not with the bed alone. A cold nozzle tip can trigger the probe arm prematurely. See Probe arm bending and Bed leveling system.