
Material profiles in Ginger Slicer
A material profile in Ginger Slicer stores all the per-material settings for the G1: temperature zones, flow calibration, speed limits, additives, and cooling. Getting the profile right for each pellet is the main calibration task before printing.
The profiles that ship with the slicer
Section titled “The profiles that ship with the slicer”Ginger Slicer comes with these material profiles ready to use. They are the starting points — the datasheet for the grade in your hopper is still the authority, and anything you change belongs in a copy.
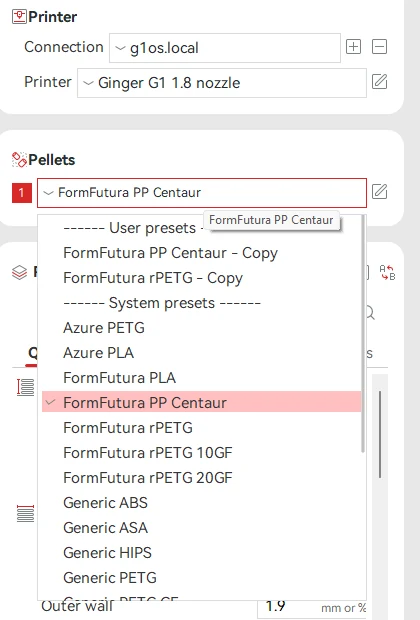
The list splits in two: system presets are the ones Ginger ships and cannot be edited, and user presets are your own copies, which is where your changes go.
| Profile | Zone 1 | Zone 2 | Zone 3 | Bed | MVS |
|---|---|---|---|---|---|
| Generic PLA | 200 | 200 | 200 | 50 | 200 |
| FormFutura PLA | 200 | 200 | 200 | 50 | 200 |
| SmartMaterials PLA (olive, oyster) | 185 | 185 | 185 | 50 | 200 |
| Azure PLA | 215 | 210 | 210 | 60 | 200 |
| Ginger rPLA | 205 | 200 | 200 | 55 | 180 |
| colorFabb FOAM PLA | 185 | 210 | 210 | 70 | 500 |
| Generic PETG | 220 | 240 | 240 | 80 | 200 |
| Azure PETG | 210 | 210 | 210 | 80 | 250 |
| FormFutura rPETG | 215 | 235 | 235 | 80 | 200 |
| FormFutura rPETG 10GF | 205 | 225 | 225 | 80 | 200 |
| FormFutura rPETG 20GF | 220 | 235 | 245 | 80 | 200 |
| Generic PETG GF | 220 | 235 | 245 | 80 | 200 |
| Polymaker PETG 10GF | 190 | 230 | 240 | 80 | 200 |
| Polymaker PETG 20GF | 220 | 230 | 240 | 80 | 200 |
| Generic PP / FormFutura PP Centaur | 170 | 240 | 230 | 80 | 200 |
| Generic ABS / ASA, MAIP ASA 5GF | 220 | 240 | 260 | 80 | 200 |
| Generic HIPS | 210 | 230 | 230 | 80 | 200 |
Temperatures are the first-layer values the profile sends to the printer at the start of a print.
Where profiles live in the UI
Section titled “Where profiles live in the UI”Material profiles are accessed from the Pellets panel in the Prepare tab (the middle column). Click the material name to open the profile list, or click the settings icon to edit the currently selected profile.
Profiles are stored locally on your machine. They are not automatically synced between computers — see Importing and exporting profiles below.
Key fields in a pellet material profile
Section titled “Key fields in a pellet material profile”Where the temperatures actually are
Section titled “Where the temperatures actually are”Open a profile with the pencil beside the Pellets box. The dialog has six tabs; the temperatures are on Filament, under Print temperature.
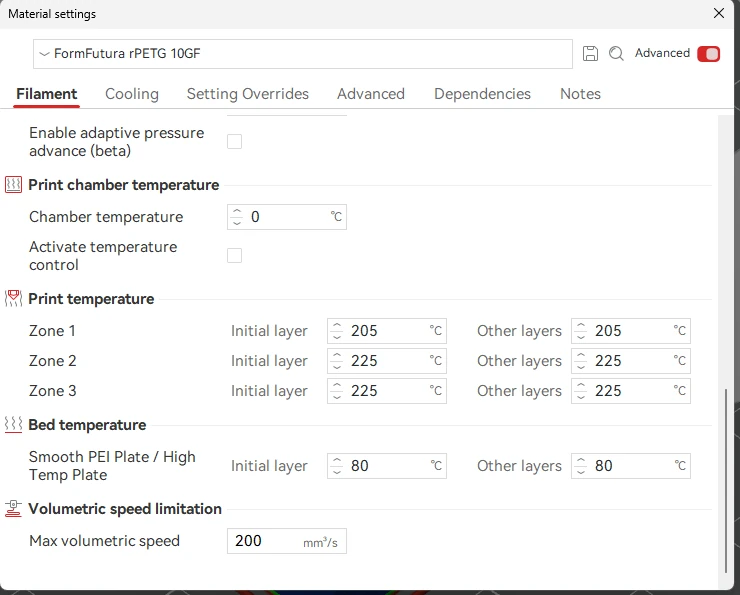
The fields are labelled Zone 1, Zone 2 and Zone 3 — top to bottom of the barrel, matching Multi-Heating Zones.
Below them sit Bed temperature, split the same way, and Max volumetric speed — the per-material MVS, which is where the 200 mm³/s in the shipped profiles comes from.
What else is in the dialog
Section titled “What else is in the dialog”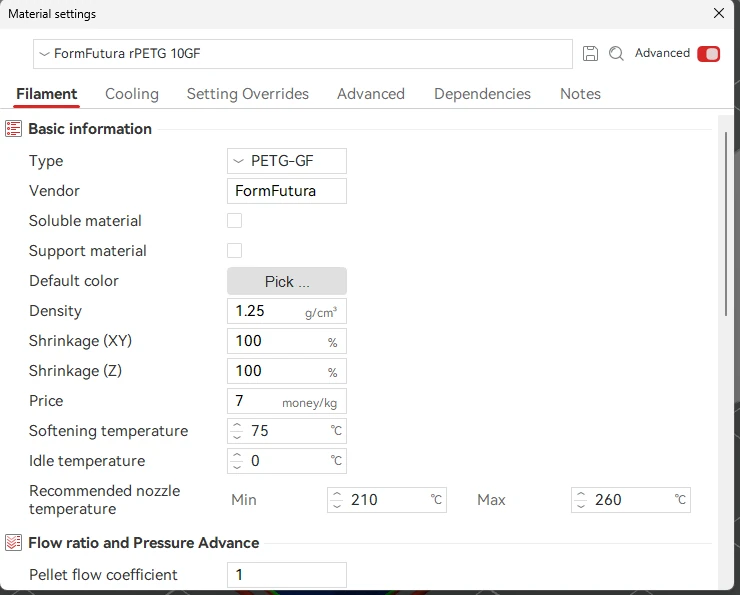
The Filament tab opens with the material’s identity and physical properties — density, shrinkage, price, and a recommended nozzle temperature range that acts as a sanity check on what you type into the zones.
Two fields worth knowing:
- Softening temperature — the point the material starts to go soft. For the PETG-GF above it is 75°C, and it is the same figure as the HDT quoted in the PETG note
- Pellet flow coefficient — the field that makes the whole pellet workflow possible. See below
The other tabs: Cooling holds every fan setting, Setting Overrides lets a material force process settings, Dependencies ties the profile to particular printers, and Notes is free text.
The Pellet flow coefficient, and why it is 1
Section titled “The Pellet flow coefficient, and why it is 1”A slicer thinks in filament: it works out how much to extrude from a diameter. Pellets have no diameter, so the coefficient stands in for one — it describes the packing density of a particular pellet, meaning how much material one turn of the feed actually delivers.
The slicer then converts it into a filament diameter and carries on as if nothing had changed:
filament diameter = sqrt( 4 / (pi x pellet flow coefficient) )That is where the G1’s odd-looking configuration comes from. Every shipped profile sets the coefficient to 1, which works out to a diameter of 1.1284 mm — and a circle of that diameter has a cross-section of exactly 1 mm².
With a 1 mm² section, one millimetre of “filament” is one cubic millimetre. That is what lets the machine speak in mm³ throughout: the E values in G-code, Rotation Volume, MVS, the extrusion readout. The same 1.1284 appears in the printer’s own printer.cfg, put there for the same reason.
For comparison, the upstream default coefficient of 0.4157 converts to 1.75 mm — ordinary filament.
Leave it at 1 unless you are deliberately re-deriving the flow basis for a pellet. Changing it silently rescales every volume the slicer computes.
Rotation Volume
Section titled “Rotation Volume”The most important G1-specific parameter: mm³ of material per screw revolution. This must be calibrated for each material and nozzle combination — do not copy values between materials without re-calibrating.
See Rotation Volume calibration for the measurement procedure.
Max Volumetric Speed (MVS)
Section titled “Max Volumetric Speed (MVS)”The safe ceiling for extrusion rate in mm³/s. Exceeding this causes the extruder motor to skip. Start conservatively (200–250 mm³/s), then increase after adding SmoothFlow.
See Max Volumetric Speed for how to find your material’s limit.
SmoothFlow
Section titled “SmoothFlow”SmoothFlow is the Ginger Additive liquid lubricant added to pellets before loading. It significantly reduces screw friction and raises the achievable MVS.
If you are using SmoothFlow, note the percentage in the profile description so you can reproduce the same mix. SmoothFlow changes the flow behavior, so MVS and Rotation Volume should be calibrated with SmoothFlow applied, not on dry pellets.
See SmoothFlow for dosing and usage guidance.
Cooling
Section titled “Cooling”Fan settings are material-specific. Key fields:
- No Cooling for First Layers: set to at least 4 — early layer cooling causes poor bed adhesion
- Fan Speed: start at 0%, increase only if small features deform
- Min Layer Time: slows the print on short layers; 10–15 s for PLA, 5–10 s for PETG
Naming convention
Section titled “Naming convention”Use a consistent name so profiles are easy to identify when you have many materials:
[Supplier]_[Polymer]-[Grade]_[Variant]Examples:
Formfutura_PETG-GF_20pctFormfutura_rPLA_batch-2026-04Generic_PLA-virgin
Include batch information in the name or description when the supplier ships inconsistent batches. Different batches of the same material can differ by 5–10% in Rotation Volume.
Importing and exporting profiles
Section titled “Importing and exporting profiles”To export a profile for backup or sharing with another machine:
- Open the material profile in Ginger Slicer
- Click the export (save) icon or go to File → Export → Export Config
- Save the
.jsonfile
To import on another machine:
- Go to File → Import → Import Configs
- Select the
.jsonprofile file - The profile appears in the Pellets list and can be assigned to the G1 printer
Starting from Ginger’s default profiles vs. creating from scratch
Section titled “Starting from Ginger’s default profiles vs. creating from scratch”Start from a default profile when:
- Ginger Additive ships a pre-tuned profile for your material (check the Ginger Slicer profile library)
- You are printing a Ginger-recommended material (PLA virgin, PETG clear, rPLA, PETG GF)
Create from scratch (by duplicating the closest existing profile) when:
- The material is not in the default library
- You are printing a specialty or third-party pellet
- You need a batch-specific calibration separate from the generic profile
Never edit a default Ginger profile directly — always duplicate first, rename, then modify the copy. This preserves the reference profile.
When to create a new profile vs. when to use overrides
Section titled “When to create a new profile vs. when to use overrides”Use a new profile when:
- The material is genuinely different (different polymer family, different supplier, significantly different processing window)
- You want to keep a stable reference for a specific batch
Use Setting Overrides within an existing profile when:
- You need a small adjustment for a specific print geometry (e.g., different retraction length for a tall thin part)
- You are testing a parameter change and do not want to permanently alter the calibrated profile
Setting Overrides are per-profile fields in Ginger Slicer that override base values without changing the underlying calibration. This keeps the base profile clean and makes it easy to revert.
Related notes
Section titled “Related notes”- Rotation Volume calibration — how to measure and set Rotation Volume
- Creating a material profile — full step-by-step calibration workflow
- Multi-Heating Zones — hardware context for the three barrel zones
- Max Volumetric Speed — finding your safe MVS ceiling
- SmoothFlow — pellet lubricant and its effect on flow