
Initialize the printer
Every G1 configuration is published by Ginger for one specific serial number. Initializing is the step that tells the printer which serial it is, so it can fetch its own files instead of running whatever happened to be on the card.
Which case are you in?
Section titled “Which case are you in?”Both cases end at the same place, and both use the same form. What differs is what you start from.
| You just flashed the SD card | The machine has been running, but was never initialised | |
|---|---|---|
| Starting point | A blank G1OS — no serial, no configuration, no bed mesh | An old configuration, hand-edited or factory, sitting on the machine |
| What you are doing | Setting the machine up from zero | Migrating it onto the Configurator |
| Anything to preserve? | No — the flash already erased it | Yes — note your printer.cfg edits before you start |
| Bed mesh | Gone. You will re-level | Gone after the update. You will re-level |
What this actually unlocks
Section titled “What this actually unlocks”Before initialization, your printer’s configuration is whatever was on it when it left the factory or when someone last edited it by hand. Nothing connects it to Ginger.
After initialization, the machine knows its own serial number, and that changes what it can do:
- Ginger keeps a configuration for your specific machine, not a generic one. Once the printer knows its serial, it can fetch its own files
- The sidebar gains a by Ginger Additive entry. That entry is a status light: when configuration updates are waiting for your machine it turns into UPDATE G1
- The printer checks for those updates by itself, once an hour
Without the serial, none of that works — the machine has no way to ask which configuration is its own. See G1OS software stack.
When to do it
Section titled “When to do it”- After flashing the SD card — always. A fresh G1OS knows nothing about your machine
- After a major G1OS update that introduces the new Configurator, on a machine that predates it
- When the G1OS dashboard shows an INITIALIZE PRINTER button
Prerequisites
Section titled “Prerequisites”- Printer powered on and connected to the same network as your computer
- G1 serial number (printed on the top right corner of the machine, on the display side / left side)
- Access to
http://g1os.local
Step 1 — Connect to G1OS
Section titled “Step 1 — Connect to G1OS”- Open a browser and go to
http://g1os.local - The G1OS (Mainsail) dashboard appears
Step 2 — Update GingerConfigs
Section titled “Step 2 — Update GingerConfigs”- Go to the Machine section in the left sidebar
- In the Update Manager tab, click the refresh arrow to check for updates
- Find the GingerConfigs row and press the UPDATE button on that row
- When the confirmation dialog appears, check “I understand the risks” and click START UPDATE
- G1OS downloads and installs the latest GingerConfigs version
Step 3 — Reboot machine AND browser
Section titled “Step 3 — Reboot machine AND browser”-
Wait for the update to complete — the printer performs a firmware restart automatically
-
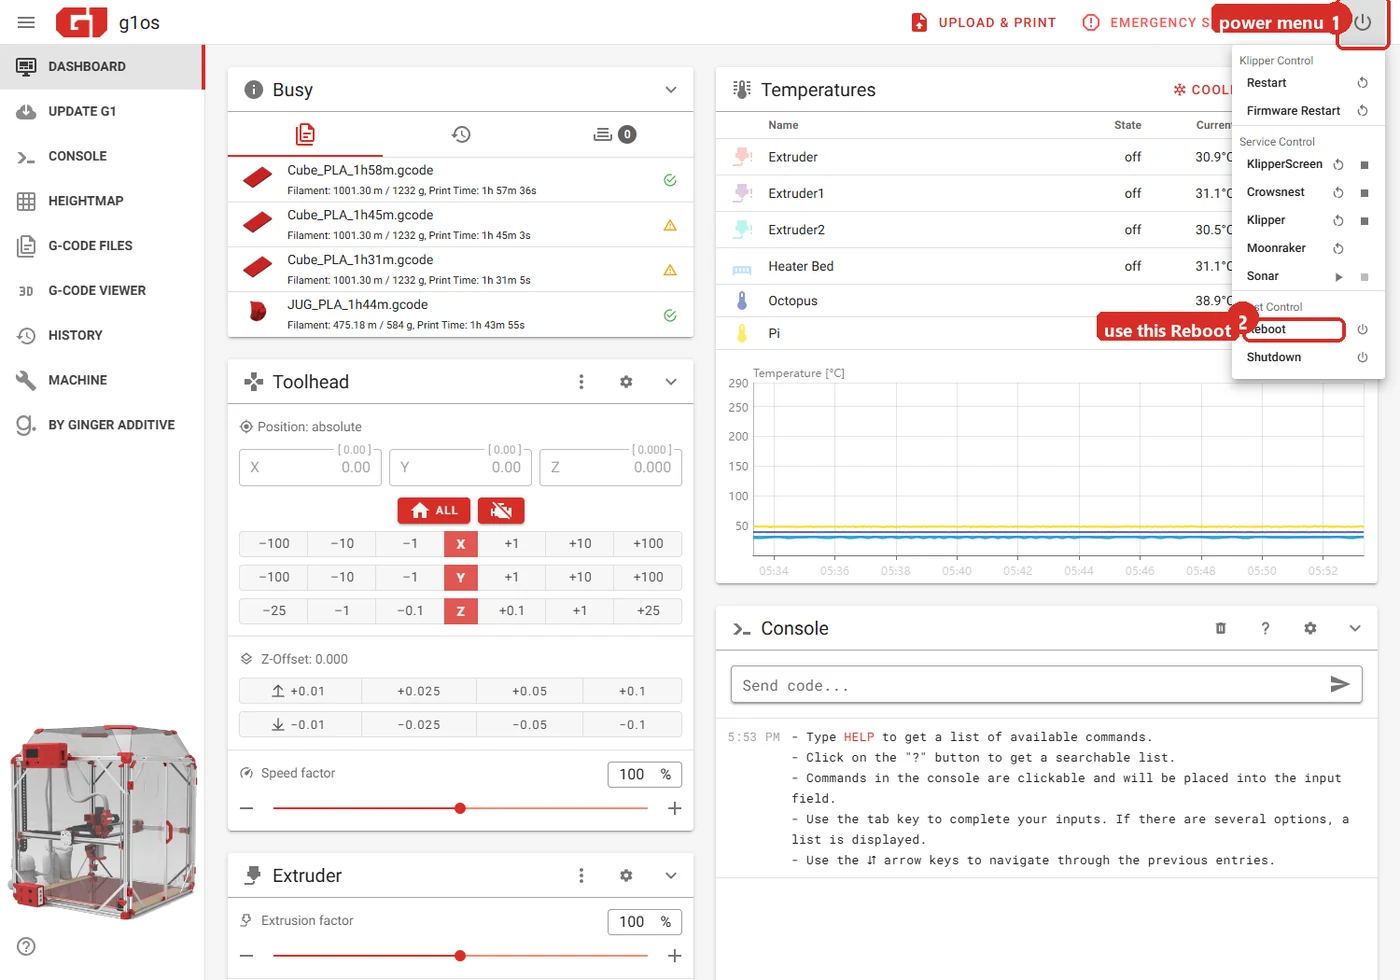
After the firmware restart, perform a manual reboot: click the power icon (top right) → Reboot, under Host Control — not Restart or Firmware Restart, which only restart Klipper
-
Close the browser tab completely — without closing the browser, the updates will NOT be applied
-
Open a new browser tab and go to
http://g1os.local
Step 4 — Initialize the printer
Section titled “Step 4 — Initialize the printer”-
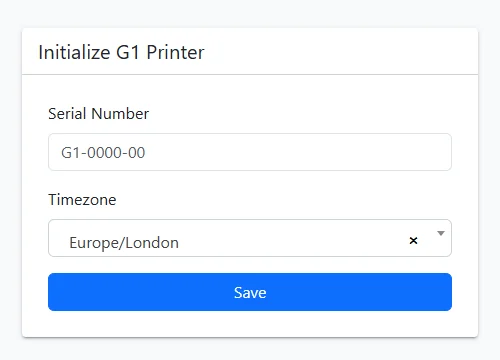
Look in the sidebar for INITIALIZE PRINTER and click it.
The Initialize G1 Printer form appears
-
Fill it in:
- Serial Number — your machine’s serial, in the form shown as the placeholder. It is printed on the top right corner of the machine, on the display side. It must match exactly: this is the name of your machine’s configuration folder at Ginger, so a typo means the printer asks for a configuration that does not exist
- Timezone — yours. It defaults to
Europe/London, so change it unless that is right for you
-
Click Save. The page returns to the dashboard
Step 5 — Download your configuration
Section titled “Step 5 — Download your configuration”Saving the serial does not download anything by itself. It tells the printer which configuration is its own; fetching it is the next step.
-
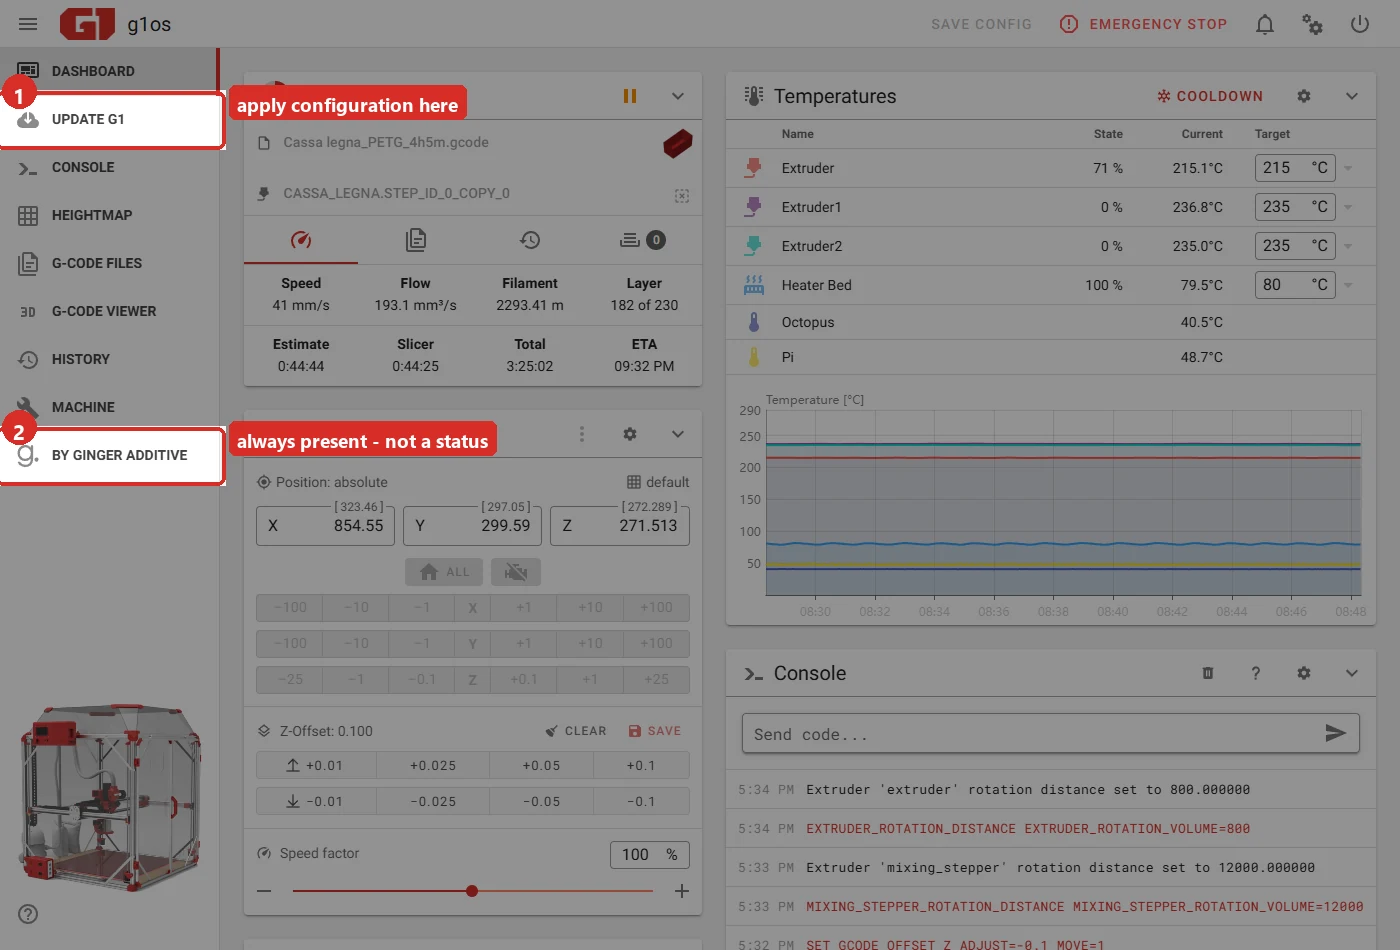
Look at the sidebar. UPDATE G1 has appeared
-
Click UPDATE G1. The printer downloads
printer.cfg,moonraker.confandkamp.cfgpublished for your serial -
Wait for the page to return. The printer restarts Klipper by itself, because
printer.cfgchanged -
The machine now has its configuration. by Ginger Additive stays in the sidebar throughout — it is a permanent entry, so do not use it to tell whether the step worked. Check the config files instead
Final verification
Section titled “Final verification”After rebooting, the G1OS dashboard loads normally with no “INITIALIZE PRINTER” prompt. The printer is ready for printing with the latest configuration.
- The serial number is on a label on the top right corner of the machine frame, on the same side as the display (left side when facing the printer)
- If the INITIALIZE PRINTER button does not appear after rebooting, try clearing the browser cache or using a different browser
- After initialization, all slicer profiles and print settings are loaded via cloud — no manual configuration needed
Related notes
Section titled “Related notes”- G1OS installation — the step before this one when you have flashed the card
- Flashing the control boards — the firmware this procedure does not touch
- Klipper firmware update
- Raspberry Pi and SD card
- Mainsail dashboard basics
- First boot checklist