
Mainsail dashboard basics
The printer runs Mainsail, a web interface you open from any browser on the same network. Nothing is installed on your computer.
Getting it to open
Section titled “Getting it to open”- Power the printer on and wait about a minute for it to join the network.
- Open a browser on the same network and go to
http://g1os.local. - The dashboard should appear straight away.
If the address does not resolve, it is almost always the network, not the printer:
- Check the band. The Raspberry Pi only joins 2.4 GHz. If your computer is
on the 5 GHz half of a network that shares one name,
.locallookups can fail between the two. Join the same band, or use the IP address. - Find the IP in your router’s device list and open that instead. It works even when name lookup does not.
- Restart the router if the name has never resolved - a fresh machine’s name takes a few minutes to propagate.
Prefer the name over the IP for day-to-day use: the IP can change when the printer reconnects, the name does not.
What each section is
Section titled “What each section is”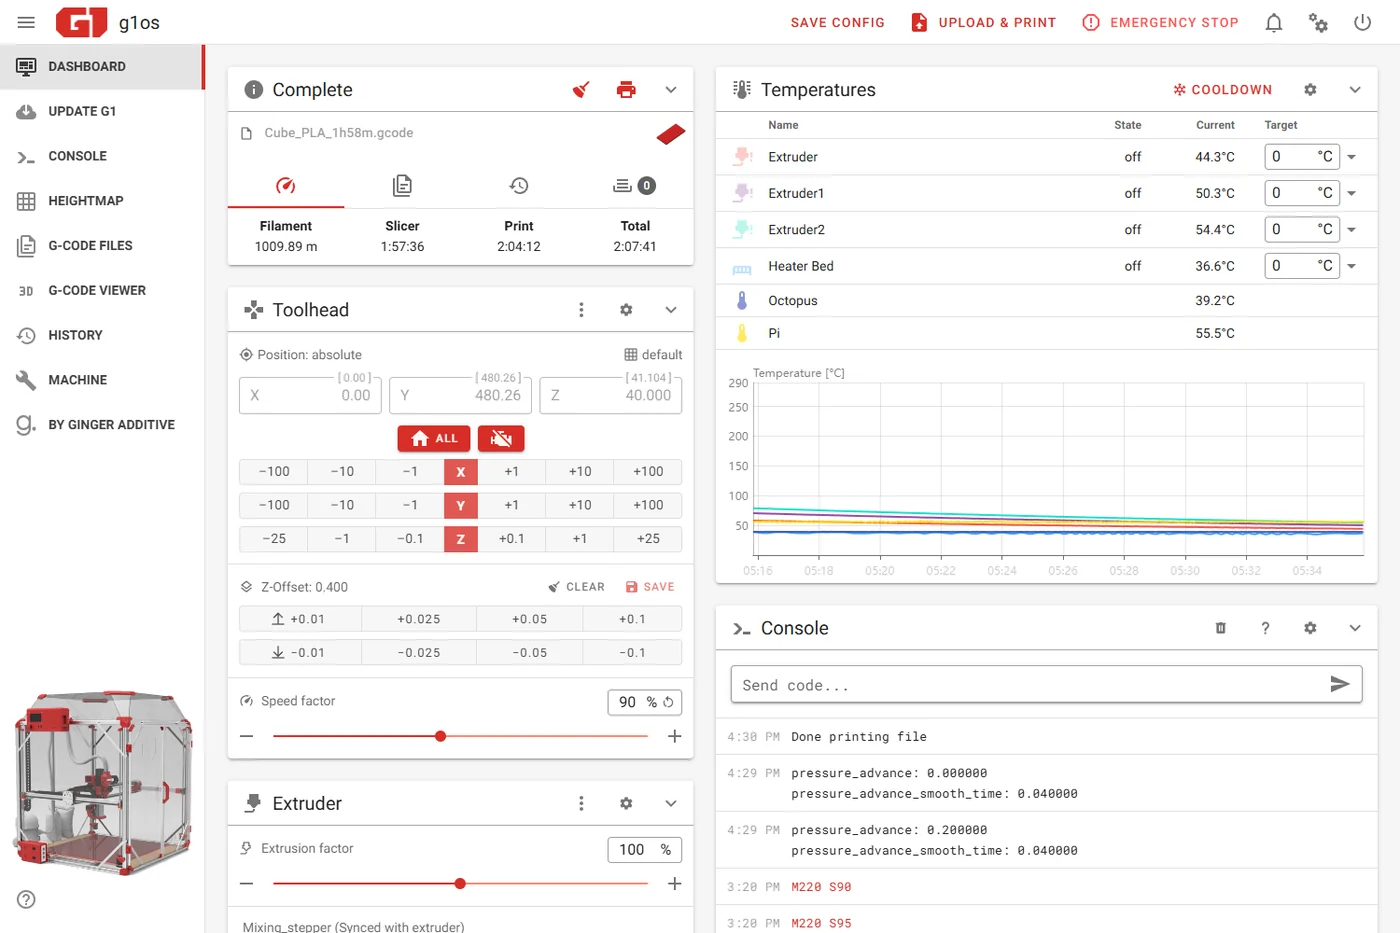
The sidebar carries the sections below, plus two entries that are Ginger’s own: UPDATE G1, where the printer applies its own configuration, and by Ginger Additive at the bottom, which is always there and is not a status.
Dashboard
Section titled “Dashboard”The home screen, and where you will spend a print.
- Temperatures - one row per heater. The G1 shows four:
heater_bedand the three barrel zones, listed as extruder, extruder1 and extruder2. Those are T0, T1 and T2 - the Feeding, Melting and Nozzle zones, counting from the top of the barrel. Two more rows are sensors only, with no heater behind them: Octopus (the main board) and Pi. - Click the temperature graph to expand it. A zone that saws up and down across several degrees, or climbs far more slowly than the others, is worth reading here before anything else.
- Toolhead - axis positions and the manual jog buttons.
- Macros - the buttons that do the G1’s own jobs. See below.
The macros you will actually press
Section titled “The macros you will actually press”The G1 ships a long macro list, most of which are internal steps that the printer calls itself. These are the ones meant for you:
| Macro | What it does |
|---|---|
BED_LEVEL | Homes, probes the bed, and saves the result. The one to run after moving the machine. |
LOAD_MESH | Homes and loads the saved bed mesh without re-probing. |
SCREW_ADJUSTMENT | Tells you which Z rod to turn by hand, and by how much. There are no bed screws on the G1 — the gantry is trammed, not the plate. |
CHANGE_NOZZLE | Walks the machine through a nozzle change. |
CHANGE_MATERIAL | Walks the machine through a material change and purge. |
EXTRUDER_ROTATION_DISTANCE | Sets the Rotation Volume for the screw. |
MIXING_STEPPER_ROTATION_DISTANCE | The same, for the hopper auger (E1). |
SET_PRESSURE_ADVANCE_AND_SMOOTH_TIME | Changes Pressure Advance live, mid-print. |
LOAD_FILAMENT / UNLOAD_FILAMENT | Drive material in and out by hand. |
PAUSE / RESUME / CANCEL_PRINT | Print control. |
Anything beginning with an underscore is an internal step. Leave it alone - those macros expect to be called in sequence, and pressing one on its own can move the machine in ways you are not expecting.
Heightmap
Section titled “Heightmap”Left sidebar, then Heightmap. Shows the bed mesh from the last BED_LEVEL run.
Two names show up here. global is the full-bed probe that BED_LEVEL
saves and LOAD_MESH loads. mesh1 is written at the start of each print,
probed only across the area the part covers — so after a print, that is the one
you are looking at.
On a machine that has never run BED_LEVEL there is no global yet, and
LOAD_MESH has nothing to load. Run BED_LEVEL once before the first print.
See Bed leveling system for which mesh
a given print actually uses.
Reading it: a mesh sitting inside a few tenths of a millimetre is normal and the
printer compensates for it. What matters is not the absolute numbers but the
shape - a bed that slopes steadily from one side to the other is a levelling
job for SCREW_ADJUSTMENT, not something to correct in software.
Console
Section titled “Console”The Klipper terminal. Type G-code, and read what Klipper says back - when a print fails, the reason appears here first.
PID_CALIBRATE exists in Klipper but is never run on the G1. A zone that
will not hold temperature has a physical fault; see
Troubleshooting a temperature fault.
G-Code Files
Section titled “G-Code Files”Where sliced files live, and where you start a print from. Drag a file onto the page to upload it, or send it straight from Ginger Slicer.
This folder is the only place the printer reads G-code from. A USB stick plugged into the Raspberry Pi will not show up here.
Machine
Section titled “Machine”Maintenance lives here.
Config Files - the printer’s configuration, editable in the browser.
printer.cfg- the machine’s own config.G1-Configs/- the Ginger layer: macros, screen and interface config. These are written by the configurator and replaced on update, so anything you change by hand here is lost the next time. Change settings through the configurator.- After an edit, Save & Restart applies it.
Update Manager - eight rows: klipper, moonraker, mainsail,
mainsail-config, KlipperScreen, crowsnest, GingerConfigs and system.
The full procedure is in Klipper firmware update.
System Loads - live CPU and memory for the Raspberry Pi.
History
Section titled “History”Every past job with its duration and how it ended. Useful for the thing that is otherwise hard to reconstruct: whether a print that came out wrong actually finished, or stopped early.
Getting the logs for support
Section titled “Getting the logs for support”The logs are their own section, not part of Config Files: left sidebar, Machine, then the Logs area.
Attach these when you report a problem:
klippy.log- Klipper’s own events and errors. This is the one that matters.moonraker.log- the API layer between the browser and Klipper.crowsnest.log- the camera service.
Restart, reboot, shut down
Section titled “Restart, reboot, shut down”Top-right power icon.
| Option | What it does |
|---|---|
| Restart | Restarts the Klipper host process. Re-reads the config. Seconds. |
| Firmware Restart | Also resets the control boards and re-establishes the link to them. What to use after a SAVE_CONFIG, or when a board has dropped off. It does not flash any firmware - the name is Klipper’s, not a description. |
| Reboot | Full Raspberry Pi restart, about a minute. |
| Shutdown | Powers the Pi down. Wait for the activity to stop before cutting mains power. |
See Firmware restart for when each one is the right answer.
When something is wrong
Section titled “When something is wrong”| What you see | Usually means | What to do |
|---|---|---|
g1os.local not found | Name lookup, not the printer | Use the IP from your router; check you are on 2.4 GHz |
| Page loads, says Disconnected | Klipper host stopped | Firmware Restart from the power menu |
| ”Klippy is not running” banner | Same, or a config error | Read the Console - the reason is printed there |
| All zones show Off or nothing | The control board is not talking | See Klipper MCU communication lost |
| Interface slow or stuttering | Pi under load | Check System Loads; the camera is the usual cause |
| Display shows Unauthorized, browser fine | Moonraker was updated to 0.11 | Display stuck after a Moonraker update |